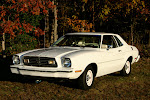
When I first got the car, it had to warm up forever or it would stall. At stop lights, I had to be careful to feather the gas pedal to keep it from quitting on me. I enjoy an occasional adrenaline rush, but not at every intersection!
Anyway, our first order of business was to get the car running better. This would end up taking a while as we troubleshooted/fixed/replaced/fiddled with different parts of the engine over several months.
First, we ordered a rebuilt carburetor and my dad and I installed it. With the new carb, the car ran strong on straightaways with no hesitation but ran rough at slow speeds. After that, we did a tune up, replacing the spark plugs and wires, distributor cap and rotor.
Next, I drove the car to my brother's place and he adjusted the fuel/air mixture, fiddled with the vacuum advance tubing, and reconnected the kickdown rod. The hesitation was 99 percent gone after all that. When I drove home I got stuck in bumper-to-bumper traffic and the car never stalled or overheated. Yay!
The last piece of the puzzle was the fuel pump, which was going bad. As soon as we replaced that (only $30), the car ran better than ever. Now I can drive it without worrying about being stranded (although I do have roadside assistance through my insurance so I can get a tow home if that happens).
Update: Even though the car is more reliable and runs smoothly now, the engine leaks oil, and could use a reseal. I'm hoping to get this done in September/October 2010 (more on this later).
Monday, May 17, 2010
Monday, May 10, 2010
Trunk Before & After
My first major project was the trunk area. The weatherstripping as you can see from the picture (left) was dry rotted and peeling and I didn't like how the backs of the tailights were exposed. I found out that standard coupes didn't come with anything but a simple gray trunk carpet and a round piece of wood covering the spare tire. I wanted a cleaner look, so I purchased a plastic panel that came out of a 1978 Ghia to cover the taillight assemblies.
There was some rust around the trunk lid, so after removing the old weatherstrip (a nightmare!) I used rust treatment on the visible rust, and painted around the trunk lid and in the weatherstrip channel with white Rustoleum.
The next job was to install new weatherstripping, which I got from SSC Enterprises, but it did not go as planned. The weatherstrip dried all twisted in the corners and sticking out of the channel. I was so disappointed because I'd spent forever prepping and painting areas of the trunk and channel only to have the weatherstrip installation botched. I had to pull up the ruined weatherstrip, which thankfully did not cost a lot, but still, and scrape the adhesive off (again!) & repaint. Grr. Fortunately, around that time, I'd picked up a dremel tool with a wire brush and that made it a little easier than the first time.
After this setback I decided not to make a second attempt. Plus the next job would have been to replace the roof rail weatherstrip, which was supposed to be even trickier. So after ordering another package of trunk weatherstripping, I took the car to a body shop nearby and they did the trunk and roof rail for $95.
The last step was to find a jack assembly. The car's original assembly was missing, so I bought a used one from another II owner and the jack assembly is now complete and correct. Plus I bought a new reproduction jack instructions decal and affixed it in the right spot next to the spare tire.
Here are the after shots:
Monday, May 3, 2010
Now for Some Tunes
My car came with the standard AM radio, but around here, there aren't any music stations on AM, just talk shows, so I needed to upgrade.
I wanted a 70s look and feel, so I bought a working 8-track AM/FM from another Mustang II owner. I also bought a new antenna off eBay because the one I had was all rusty.
My dad and brother weren't available to help on this project and back then I wasn't confident enough to attempt it myself, so I took everything to Best Buy and asked if they could do it. You can imagine their reaction when I showed up with a 77 Mustang and an 8-track player and one in-dash speaker! But they were up to the challenge (and promised to be careful) and they did an awesome job. Looking back, I can't believe I want to BEST BUY, but it all turned out OK. Whew!
Eventually I was able to track down on eBay a sealed Ford demo 8-track from 1977 that came with the new models for that year that showed people how 8-tracks worked. It's a neat piece to have with the radio.
Update: The one speaker in the dash has started to go out on me, so I'm hoping to replace it this summer (2010). I'll try this project myself, so if you have any tips for me, let me know!
Subscribe to:
Posts (Atom)